
How to Spot Premium vs. Cheap Garments: 3 Seam Details That Give It Away
Pick up any two t-shirts — one from a discount rack, one from a brand that's been in business for decades — and they might look identical from three feet away. Same color, same cut, maybe even the same fabric weight. So why does one fall apart after five washes while the other is still in rotation two years later?
The answer is almost never the fabric. It's the seams.
After years on the production floor, we've found that you can predict a garment's lifespan just by looking at three things: how tight the stitching is, what happens at the corners, and whether the pattern lines up. None of these require a lab. You can check all three with your own eyes and a fingernail.
Here's what to look for — and what it actually takes on the factory floor to get it right.
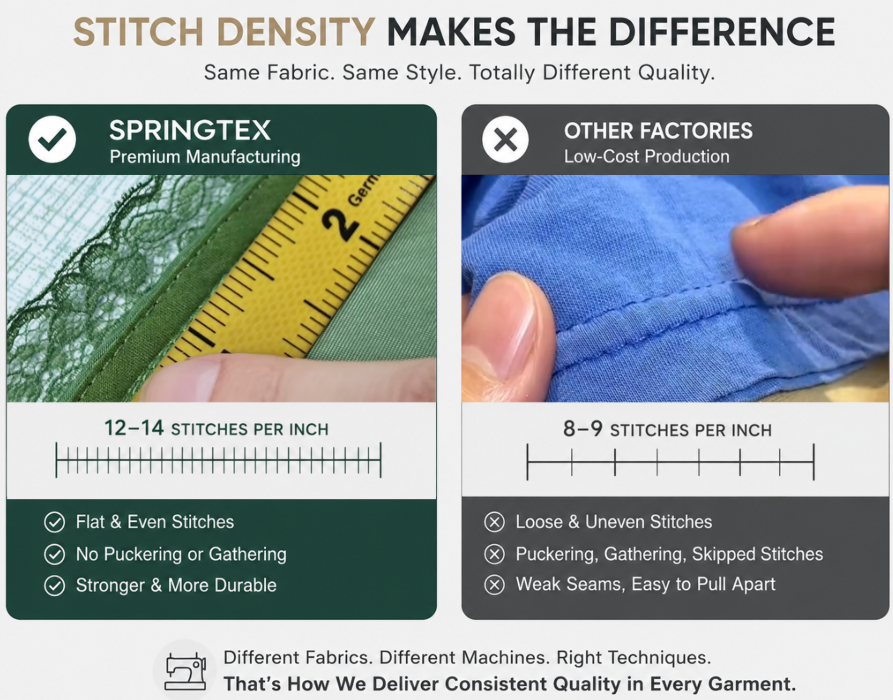
1. Stitch Density: Count the Stitches, Not the Price Tag
Stitch density — measured as stitches per inch (SPI) — is the single most reliable number in garment quality control. It's also the easiest to fake your way around, which is exactly why cheap factories cut corners here first.
A looser stitch means less thread, less machine time, and a faster line. It also means the fabric has more room to shift while it's being sewn, which is where puckering, gathering, and skipped stitches come from.
Industry data backs this up plainly: mass-market production commonly runs 8–10 SPI to keep lines moving fast, while garments built to hold up over time typically land in the 12–14 SPI range, with fine shirting pushed even higher.
We don't run one machine setting across every order. Different fabrics need different densities, and different operations need different tools — a curved yoke and a straight side seam simply don't behave the same way under a needle. For the areas where precision matters most (collars, plackets, pocket edges), we use template machines with programmed stitching. It's slower to set up, but it removes human variance and keeps every unit in a run identical.
How to check it yourself: Lay a ruler along a seam, mark one inch, and count the stitches inside it. Fewer than 10 on a lightweight woven or knit is a red flag.
2. Corners and Fasten-Offs: The Detail Nobody Photographs, But Everybody Feels
Stitch density tells you about the seam's body. Corners and fasten-offs tell you about its ends — and ends are where seams actually fail.
In a rushed factory, thread at a corner just gets cut. There's no backstitch, no lock, nothing holding that last loop in place. It looks fine on the rack. Then someone pulls a pocket flap or tugs a hem, one loop slips, and the whole line of stitching starts to unravel like a pulled sweater thread.
Premium construction treats every start and stop as its own small commitment: backstitch at the beginning, backstitch at the end, every single time, on every seam that will see stress — pocket corners, belt loops, waistbands, zipper ends. Pull on it and it should hold; nothing should shift.

How to check it yourself: Find a stress point — a pocket corner, a belt loop, a fly seam — and give it a firm (not violent) tug. If a thread loop pops loose or you can see bunched thread balled up at the corner with no backstitch, that's a factory cutting time, not corners on quality.
3. Symmetry and Pattern Matching: The Detail You See Before You Even Touch the Garment
The first two details require you to look closely. This one is visible from across the room.
Hold a shirt up and look at both side seams — do they sit at the same angle? Check a striped or plaid garment at the seam line — does the pattern continue, or does it jump? In a cheap factory, the left and right sides of a garment are often stitched by different operators with different tension settings, at different speeds, with no cross-check. The result is visible asymmetry: one sleeve seam sits slightly forward of the other, margins vary by a few millimeters from panel to panel, and any striped or checked pattern breaks at the seam instead of flowing through it.
Getting pattern matching and symmetry right isn't about one skilled operator — it's about cutting accuracy, consistent seam allowances, and quality checks built into the line rather than tacked on at the end. At Springtex, that's the baseline, not the upsell: precise, consistent margins on every panel, and pattern that flows across a seam instead of breaking at it.
How to check it yourself: Fold the garment in half along the center front or back. The side seams, hems, and any repeating pattern should mirror each other. If they don't, the cutting and sewing weren't cross-checked.
How This Actually Happens on the Floor: The Springtex Inspection Workflow
None of the above happens by accident — or by hoping operators get it right. It's a workflow, checked at each stage rather than only at the end of the line.
Fabric & Style Review → Machine & Stitch Matching → Cutting & Panel Check
│ │
▼ ▼
Operator Assignment by Skill Zone ←────────────────── Pattern Alignment Mark
│
▼
In-Line Stitching (SPI + tension checked per station)
│
▼
Corner & Fasten-Off Reinforcement (backstitch verified)
│
▼
Symmetry & Pattern Match Check (mirror-fold inspection)
│
▼
Final QC & Pull Test → Approved for Packing
Two things matter about this sequence. First, machine and stitch density get matched to the fabric before anyone sews a single seam — not adjusted after a defect shows up. Second, symmetry and corner checks happen in-line, at the workstation, not only during a final inspection when a defective batch is already finished and harder to fix.

Quick Checklist: What to Look For on Your Next Inspection
The Bottom Line
You don't need a lab to tell a well-made garment from a rushed one. Count the stitches, tug a corner, fold it in half and check both sides. Three checks, thirty seconds, and you'll know more about a garment's real quality than any hangtag can tell you.
Different fabrics call for different machines, different stitch settings, and different levels of hand-finishing — and a factory that treats every order the same way is usually the factory cutting corners somewhere you can't see yet. If you're sourcing production and want a partner that treats stitch density, corners, and symmetry as non-negotiable rather than optional upgrades, that's exactly the standard we build to at Springtex — reach out and we'll walk you through a sample run before you commit to a full order.
References
ASTM International. ASTM D6193-16(2020), Standard Practice for Stitches and Seams. West Conshohocken, PA: ASTM International, 2020. https://www.astm.org/d6193-16r20.html
American & Efird (A&E). Technical Bulletin: Stitches Per Inch (SPI) — What You Should Know. https://www.amefird.com/wp-content/uploads/2010/01/Selecting-the-right-SPI-2-5-10.pdf
Fibre2Fashion. Stitches per Inch in Garments: Formula for Estimating Seam Strength on Woven Fabrics. https://www.fibre2fashion.com/industry-article/7121/stitches-per-inch
Fatal error: Allowed memory size of 134217728 bytes exhausted (tried to allocate 15947904 bytes) in /www/wwwroot/springtex.com/include/pdo.class.php on line 54